Kitchen · Recipes

Honey Pizza Dough


There is just something about homemade pizza that makes it so much yummier than frozen. We have been using frozen pizza or the Aldi Take & Bake pizzas for our pizza nights lately. I have just not been motivated to make our dough. This week, though, I had a taste for homemade, so we are back at it!

I LOVE this recipe for honey pizza dough. I don’t remember where I pulled it from, but it is the only one I have been using for a few years now. I think the honey in it gives it a unique sweetness! 

Honey Pizza Dough

1/2 cup warm water

2 TBSP yeast

5 cups bread flour

1 1/2 cups cool water (i use room temp)

2 tsp salt

1/4 cup olive oil

2 TBSP honey

Mix yeast into warm water in a largw bowl. Let sit about 10 minutes or until bubbly. Add in cool water, salt, oul and honey. Then add in flour and combine well. 


Dump onto lightly floured surface and hand knead for about 7 minutes. Place jnto a grease bowl, cover and let rise for 30 minutes. 


*I cover with a warm wet towel, like how I cover my bread dough. The humidity creates seems to always be perfect for rising. And I have cute tea towels to use that my in-laws brought back from Australia for me. 🙂

Punch down the dough and divide into the sizes you want (several smalll to make individual pizzas or two larger for big pizzas). Shape into balls and cover to rise. Once doubled, roll out the balls to use for your pizzas!

We did two large pizzas. My helpers did the sauce and cheese. Addy made a pepperoni smiley. Lily made one with a ham heart. 


We baked ours at 450 degrees for about 20 minutes. Yum!

Kitchen · Menu Plan

My 3 Kitchen Time Savers

IMG_3341[1]

Busy.

That word probably describes all of us, unfortunately. I am slowly moving toward a less busy life by being more aware of my commitments (and not saying “yes” to everything). BUT, my days are still busy with homeschool, homemaking, five kids, and crochet. 😉 Any time I can find a way to save time on things but still produce great work…I am all for it.

I could spend hours each day in the kitchen – I love cooking and baking, trying new techniques, experimenting with recipes,…and eating. Because we have five kids and homeschool, I don’t always have the time I want in the kitchen. So, making the most of my time in there is important, as well as finding ways to save me some time in there.

Here are three ways I have found to save time in the kitchen:

1.Meal Plan

For me, it is imperative that I plan out a list of meals for each week. I know a lot of moms assign meals to specific days of the week, but I don’t like to do that. If I look and see a certain meal assigned to the day, I have a mental thing where I suddenly no longer have a taste for that food. Haha! But, if I just have a list of 7 meals from which I can choose, depending on my tastes for the day, then I am a happy camper. Meal planning ahead of time saves me TONS of time in the kitchen. Knowing what meals I have planned and shopped for gives me peace of mind that I don’t have to worry about finding a recipe that I have all the ingredients for…or starting a recipe and finding out half way through that I don’t have one of the key ingredients (been there!).

2. Prioritize My Day

It might seem odd to work in my daily plans as a way to save time in the kitchen (or maybe it doesn’t because you do it too!), but each morning I write out my three to five most important tasks for the day. Usually, school and chores and both listed, but if we have appointments or plans with friends or a library trip planned, I write those in as well since they would be a priority for us. Once I have my list of important tasks for the day, I can see how much time I will have in the afternoon to work on dinner. If we have a 3:00PM appointment, obviously I will have less time for dinner, so I will be sure to choose a dinner off our meal plan that requires less hands on work. If I see a slow cooker dinner, I may choose that and get it all prepped in the morning before we have to be anywhere out of the house. Prioritizing my day helps me plan ahead either that morning or even for the following day’s dinner because I know how busy I am on certain days, rather than just winging it and rushing through everything and scrambling at 4:00 to get something on the table in the next two hours.

3. Make Doubles

You have probably heard people talk about making double of a meal – one to eat that night and one to store for another night. I rarely make an entire double meal, but I do make doubles of things that require a lot of time for me. Bread is one of those things that takes a good chunk of my time. We eat a bread with almost every meal – biscuits, rolls, breadsticks, flatbread, cornbread, etc. I almost always make them from scratch and by hand (my preference is by hand, though I do use the bread machine from time to time). What I will do to save me time on a future meal is make double the biscuits; we’ll eat half or so for that night’s meal, and then I just put the rest in a air tight container for another meal. Sometimes dinner biscuits become biscuits and gravy the next morning (a HUGE time saver, since then all i have to make is the gravy!) or we’ll butter and jam them for lunch. Regardless of how they get used, it saves me time for that second meal not having to mix up and roll out another 12-15 biscuits.

If you don’t think you’ll get to the second half of the items doubled, you can just wrap and freeze them! If I double a soup recipe, I know we probably won’t have a second dinner of the same soup that week. I just let the extra soup cool and then scoop into freezer friendly containers and through them in to freeze until we need them. That saves a lot of time, whenever we use the second batch, because all I have to do is thaw and reheat!

When we know the days ahead will be super busy, I plan accordingly to double a few things here and there to cover us during the busy times. Salad, breads, soups, mac and cheese casseroles, taco meat, and a ton of other things are so easy to double (requiring little to no extra time while doubling!) and store for a more hectic day. If I make a salad for dinner, I always purposely make it gigantic, so I can just pack it up in a container and it’s all ready to go for the next meal when someone wants salad.


So those are three super helpful ways that I save time in the kitchen. I am sure there are so many other ways to save time; those are just the ones we use all the time and save me a huge headache each day! 😉

Do you have any tips for saving time in the kitchen?? Please share! The more time we can save, the better!!

Kitchen · Organization

Easy Peasy Lunch Drawers

It is not uncommon for me to hear of an efficient way of doing something, putting it on my checklist…and then never do it. 😉 I have read or seen many, many great ways to be efficient with housework or in the kitchen, and I have yet to try them out. BUT, I watched a video from one of my favorite homeschool moms a while back, and it was a complete lifesaver for days when I just wasn’t feeling it to make lunch.

During a certain time of the month or when life it just a bit crazy busy, it is a huge struggle/challenge/irritation for me to pause and get a lunch ready. We did the lunchbox thing for a while last school year, but, even then, I had to make room in the pantry or fridge for 5 lunch boxes and stay on top of whether or not they were packed each day, especially for the little ones. After a while, the novelty wore off, and it was just another work item added to my daily checklist (which already contained way too many items).

The video I watched was by a mom who just had her eighth baby, and she homeschools. It was just a simple, yet completely amazing, way to be efficient in the kitchen, give the kids options (but not a million options), and have them be a little more hands-on with their lunch. So, I decided to give it a whirl. I had to locate some storage containers from around the house, but I made sure I did NOT buy anything new. I did not want to spend money on this; I just wanted to try it out.

The idea is that lunch is broken down into categories, and the kids pick a certain number from each category to make a complete lunch. The categories we typically have are: main/protein item, fruit, cracker, dairy, veggies, dessert. Now, if I haven’t stayed on top of cutting veggies, sometimes we don’t have that category, but otherwise we have all of those. 😉

Here are some poor quality pics to explain: 😉


img_2160

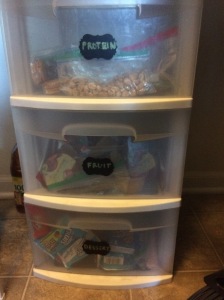
This is where I got the phrase “lunch drawers”. I have a simple three-drawer storage unit on the pantry floor that holds my protein, fruit, and dessert categories. Sitting on top of it is a shallow plastic bin for crackers (but I didn’t get a pic of that because right now the cracker bin is holding bunch of clementines). Before each grocery shopping trip, I peek in these drawers to see what needs to be refilled. Nothing crazy expensive or time-consuming goes in here. It is all about EASY lunches.

img_2162

The protein drawer has some simple items, mostly peanut buttery things. I throw in the little peanut butter crackers from Aldi or small containers with a couple spoonfuls of peanut butter (that they scoop out with apples or crackers). I will also put in the breadsticks and cheese packets from Aldi – yes, I realize they are not protein items…oh well. Some other things we’ve had in there are snack size bags of peanuts or cashews (or both) or peanut butter scoops with chocolate chips tossed in. For peanut butter scoops, I use these small plastic containers I have that hold like 1/4 cup of food. I just scoop 2-3 spoonfuls of peanut butter in, put the lid on and toss them in the drawer. Not much to it. The kids can pick ONE item from this drawer.

img_2163

The fruit drawer holds a couple different things. We have had applesauce cups, snack bags of dried fruit (raisins, cranberries, cherries, pineapple, banana, whatever we have on hand), fruit strips from Aldi, and clementines. If I offer apples or bananas, those aren’t in the drawer; they just sit on the counter or shelf for the kids to pick up. They choose ONE item from this drawer.

img_2164

Our dessert drawer does not get used every day. I don’t offer dessert with every lunch because my boys go to naps shortly after lunch, and I would rather not load them up with sugar just before. Lately, as you can see in this pic, our dessert drawer has become a catch-all for dessert-like items. Typically, the only thing in there is pudding cups. Recently, I tossed in items we have in a candy/snack container that were being picked over – rice krispie treats kids got from AWANA, a few types of Halloween candy (mostly just Reese’s peanut butter cups and mini M&M packets), candy buttons, or small packages of cookies. The only thing I went out and purchased was the pudding, but I did find if I grab snack things the kids typically overlook in the candy bin they will get eaten out of the dessert drawer. There’s probably some psychological experiment to be done there, as to why they will eat it from one bin and not the other. Haha!

img_2159

The next area, the dairy choice, is in the fridge. I have a plastic pop can holder (like $2 at Aldi!) that I repurposed to hold yogurt tubes and string cheese. I like Aldi’s Moo Tubes for the kids; the sugar is lower than in other brands or even in some yogurt cups. I just dump in the yogurt and string cheese together (based on this picture, though, I need to get more string cheese). The kids can pick ONE dairy item. And, I apologize for this awful picture; I took it a few months ago. It looks like I have a million things stacked in here; I must have just gone grocery shopping.

I did not get a picture of the cracker or veggie bins. The cracker bin is filled with snack size baggies that have different kinds of crackers – Cheez-It types, saltine types, or even graham crackers. The kids choose ONE of those baggies, if they want; not all of them choose a cracker each day. For the veggies, I keep small baggies or containers of carrots, celery, broccoli, green peppers and/or cucumbers in the veggie drawer of the fridge. They can choose ONE OR TWO items to add to lunch. I also just let them grab the ranch bottle to use with their veggies. Because the veggies require some work on my part, I don’t always keep up with keeping cut veggies on hand….or, if I do, it is one or two choices and not all five. I have just been buying the baby carrots to be sure we have at least those during the really busy weeks. And, sometimes, I don’t even get them divided up – the kids will just open a bag of baby carrots and put a couple on each of their plates.

On a lunch drawer day, I will tell them kids to go grab some drawer items. They all know to choose one protein, one cracker, one fruit, and one dairy at the very least. On a good day, they can also grab a veggie and a dessert. Just depends on how much prep mom did or how she is feeling with regard to dessert. 😉

Even Ethan, who is 3 years old, can do the lunch drawers himself….and he loves it! He gets to choose his own lunch and do what the big kids are doing. My oldest two can fill all of their cups with water, and they can all seat themselves. The only part I need to help with is opening the applesauce cups or yogurt for the younger ones. It is a win-win: they feel like they made their own lunch, and I don’t have to be as hands-on with lunch. I have been doing lunch drawers on heavy cleaning or laundry days; after we finish schoolwork, I get to cleaning or doing laundry, and I don’t like to stop mid-task to get lunch together. If I can finish folding laundry or cleaning a bathroom while they choose their lunch items, everyone is happy.

I have heard of non-homeschooling moms using the drawers, too; their kids pack their lunches using choices from each drawer/bin. So, even if you don’t homeschool, this might be a fun, efficient option for your kids!

Do you have a tip that has revolutionized your lunch prep?? Please feel free to share!

Cleaning · Kitchen

Homemade FLOP!

I am often too prideful to admit when something I made did NOT work out.

Buuut, there is no getting around this flop…

IMG_0555

Do you see that clumpy NOT LIQUID mess right there?! That was dish soap. It started out as a liquid, but overnight it became a solid.

I followed the recipe perfectly…but didn’t read all the comments, which clearly showed that some people’s results were like mine. The recipe for this soap was simple but I guess the settling of it allowed the dry ingredients to absorb ALL the liquid as it sat. I added a little warm water and mixed it up again – worked great. Then, a few hours later when I came to use it again, it was solid. So, the cycle  began – mix in a little warm water and it goes back to liquid; let it sit and it goes back to solid…and repeat like TWENTY times a day! I kept telling myself I would use it and not waste the 16 ounces I whipped up, but the inconvenience became too much after like the second day. I didn’t have time to stand there and shake it back to liquid every single time I needed to use it.

So, I ditched it and grabbed a bottle of dish soap from Aldi. 🙂 Ha! The complete opposite of the “natural” version I was trying to create, but what’s that saying….”ain’t nobody got time for that!” 😉

I won’t say where I got the recipe because I don’t want to say her recipe was bad, but I know now to read all the comments on a post before assuming it is a perfect fit for me! It just seemed that more people had solids than liquid over time…so I won’t be trying that one again. And even though I wasted the 16 ounces (AND the bottle…because I couldn’t get it all out!), it really wasn’t much money spent on the ingredients. So, I feel ok about ditching it!

Do you make your own dish soap? Have a LIQUID recipe you could share with me?? 😉 Thanks!

Chores · Cleaning · Kitchen · Organization

Morning and Evening Routines

Yesterday at our church moms’ group meeting, we had a guest speaker; she was a professional organizer. For me, this was like meeting a celebrity. 🙂 This woman wasn’t famous or anything, but organization is like…my thing. I love having a place for everything and putting everything in its place at the end of the day. So, I was thinking about what to share today and organization came to mind. I don’t mean the organization of rooms or closets, but I was thinking more about the organization of our days.

I was trying to search and find the last post I did on morning routines, and July 2013’s post about routines came up! It has been two and a half years since I talked about morning routines?! Obviously, it is time to chat about it again!

In case you ever missed it on here…I am definitely a left-brained gal. People ask me about cleaning, not creativity. 😉 I have two very creative daughters, bless their hearts. They, unfortunately have to go it alone with getting creative because this Mama really stinks at colors and fashion and “cool” stuff. Now, if they want to know how to unclog a drain or the best way to get a stain out of a shirt…I’m their girl! I can be a little creative when it comes to food, but I mostly just love recipes/instructions, routines, and logical things. Ha! Soooo, for the most part, I am boring. And I am cool with that.

But, I do want to share some helpful things for ALL moms, whether left-brained, right-brained, schedule-loving, free-thinking, or whatever. Because mornings and evenings can be the trickiest and toughest time of the day with kids. You just never now how they’re going to wake up – excited about the day or angry because they lost a stuffed animal in their bed. And we never know just how easy they’ll go down at night – sweet kisses… or “sweet sassy, get up again and I’m going to go bananas!”

Having the morning and evening planned out can help those crazy, challenging times run a little more smoothly. Or, at the very least, allow you to focus on that super needy child without worrying about the rest of the things to get done.

So, here are the things I do in the morning (usually almost in this exact order):

  1. Wake up and come straight downstairs to pour my coffee and sit to read my Bible. This is a new first item, since the beginning of January. I used to unload the dishwasher first, but I have found that (for me) if I do not sit with my coffee and Bible FIRST, I am most likely going to put it off most of the day….and my day will suck. Pardon the language there, but seriously. My day just does not start well, if I start rushing around to do a million things and have not relaxed myself with coffee and Bible.
  2. Pray with each child as they awake. Ok, this is an even newer item. Sally Clarkson shared in one (or several) of her podcasts that she got into the habit of blessing or praying with each child of hers as they got up each day and as they went to bed. She explained that it helped HER to start the day with the right attitude toward her kids. Well, since I really struggle to be pleasant in the mornings, I thought this was the PERFECT idea to help me curb my grouchiness. I have been trying to be consistent with it for about a week now, and boy-oh-boy does it make a difference. Of course, I am still trying to remember to do it each day. But I have seen how much my boys love it. I hold them close and whisper a prayer in their ear, just asking for God’s protection over them and for a good day for us. I have not yet tried this at night, as we usually pray with the kids by room (whoever shares a room gets prayed with together). I love the idea to pray with the kids as my first bit of interaction with them in the morning. I encourage you to try it. It is a little more difficult to grouch at them right after you just prayed over them!
  3. Unload the dishwasher and get out breakfast dishes. I dislike having clean dishes in the dishwasher throughout the day. We dirty dishes so fast, that I need to get them out of the sink and into the dishwasher right after each meal. Having an empty dishwasher before we start cooking breakfast serious calms me down. So, not only am I boring with my left-brainedness, I am apparently also weird. 😉
  4. Make breakfast and immediately clean up. This is along the same lines as unloading the dishwasher. I cannot stand to have dirty dishes lying about, and since we use so many dishes each meal I try to clean up as we cook or immediately after we eat.
  5. Check my Motivated Moms app for the daily to-do’s. I am absolutely still loving the Motivated Moms app, and I enjoy that the items to do are in the list and I don’t have to think about them much. I don’t have to write out my list or worry about what I have done or didn’t do….because they have the check boxes! I highly recommend this app/website for getting things done. You can always add anything specific to your day and work off the pre-loaded lists as well! Wonderful way to keep track of what needs to get done each day.

So, those are the things I do every morning. Some days do not go as I like, and I do have to move some of those around. Sickness the past few weeks did throw me off several days, but I tried hard to stick to the routine so we didn’t fall behind on anything….and so I still felt a little sane!

You might be wondering when I get my shower in, and I should mention I don’t usually shower until somewhere between 8:00 and 9:00 AM. Since we don’t typically have anywhere to be in the morning, I do a chunk of my housework before I shower (I mean, why shower if I am going to work up a sweat scrubbing counters and toilets??). And I only wash my hair every two or three days, so my showers are usually very short and easy to fit in wherever. If you need a shower early in the morning, obviously your routine would look a little different.

In the evening, I usually do the same set of tasks every night. I have identified the things that really help my mornings run smoothly if I do them at night. Like my morning routine, it just helps our household be less grouchy and keeps the mess/chaos to a minimum. In the evening, I:

  1. Clean up cookware and utensils used to make dinner as I am cooking. I may be a little over-the-top with this one, but as soon as I finish using an item to make dinner, I wash it or put it in the dishwasher. This helps keep my counter-tops clear and allows me to lay out the plates I need to fill with food. Another thing (a BIG thing) is that it gives us a lot less to clean up AFTER dinner. I don’t have a bunch of utensils or pans to wash after dinner. Usually, the one thing I have to wash is the main pan for the food (or baking dish, if a casserole).
  2. Load and run the dishwasher. As soon as we finish eating, we clear the table, load and run the dishwasher. I do not like to put it off….because I often forget later on! And then we wake up to it full of dirty dishes. One sure-fire way to start my day grouchy is to forget to run the dishwasher. 😉
  3. Set the coffeemaker. Our coffeemaker has a ‘delay brew’ setting, which I love. I set it all up to start at 5:00 AM, and all we have to do in the morning is pour it. It is heavenly. AND, it is one less thing that will delay my Bible time!
  4. Clean up all toys and clothes. We clean up toys and things on the floor several times throughout the day, but somehow these things find their way back to the floor after dinner. So, I encourage (or force) the kids to clean up all floors before bedtime – the main level as well as their rooms. I do not always succeed at having spotless floors in their rooms….for instance, if my eldest is reminded several times and I still find her dancing and singing in her room (instead of cleaning) before bed, I may just tell her to go to bed and do it before coming down in the morning. BUT, the living room and family room are all picked up every single night. It just makes me happy to see clean rooms before bed.
  5. Pray in each kid room before saying Goodnight. I love that we do this each night. We pray in the boys’ room (and then Ethan prays for Mom, Dad, and Buddy…we always have to remind him to pray for his sisters too.), then we pray with Iris (or she prays, if she wants to), and then we pray in Lily and Addy’s room. If we somehow forget to pray, Buddy will remind me as we are leaving their room. And Lily is always quick to call us back to pray if we forget. With all her eczema and sleeping challenges the last two years, I know praying with us is extremely comforting for her at night. So, I will always love doing it. It also ends the day pleasantly with each kid – no matter how naughty they were or how short-tempered I was, we can all just take a breath and pray. Of course, if we are chasing Ethan back into bed ten minutes later…well, the calmness might have worn off! But, at least we tried to put them to bed peacefully!!

Having set routines for morning and evening definitely allows my day to run more smoothly. With lots of people to feed and clothes and clean, it helps to not have to think about some things each day!

Do you have routines for morning or evening?! What do you love about your routines?


Gluten-free · Kitchen · Recipes

Recipe: Peanut Butter Oat Bars

IMG_0245


I am loving these little snack bars. Only 3 ingredients but they are incredibly tasty! These are a good option for a healthy snack that meets the sweet and salty needs. I found this recipe online a while back, scribbled it on a Post-It note and stuck in next to my fridge. Just a few weeks ago, I finally decided to make them. I tweaked the original recipe and used maple syrup instead of honey (because honey is like gold here, so I save it for illness more than I do for baking….thankfully we keep pure maple syrup on hand for that!), but the taste is just as yummy.

Peanut Butter Oat Bars (makes 16 small bars)

1 cup peanut butter (look for some that does not have added sugars)

1/2 cup honey (or pure maple syrup)

3 cups old-fashioned/rolled oats

  1. Warm the peanut butter and honey/syrup in a small pan on low heat. Stir to combine items thoroughly; do not let boil/burn.
  2. Once thoroughly mixed, pour over oats in a mixing bowl. Stir well to wet all of the oats.
  3. Line a 9×9 pan with foil. Scoop mixture into foil and press down, so thickness is even throughout.
  4. Refrigerate 30 minutes. Cut into bars. Store refrigerated.

These are really handy to grab and eat in the car. The kids take them outside. They are just easy to snack with, and these bars are pretty healthy. And if you need a gluten-free option, use gluten-free oats and you are good to go!

Happy snacking!

Kitchen

5 Things I Learned in 5 Days

This week, I participated in a clean eating challenge. The purpose of the challenge was for encouragement and accountability with eating “clean” foods. If you are new to the term “clean” when speaking of food, it just means non-processed. So no boxed stuff (unless it is just the pure form of a food), no preservatives or dyes or flavoring, no added sodium or sugars, etc.

I decided to participate for the accountability and because they provided a meal plan with snacks included. I desperately needed to get my snacking under control! The girls hosting it were representatives of a particular company that provides healthy drink mixes and whatnot, but I wasn’t purchasing any of those. I just wanted to keep track of snacks and join in the community of sharing about our food choices.

While the challenge was a mere 5 days, I learned 5 things about myself during this time. I also feel like I got myself back on track with better food choices for snacks, and I am happy with the energy I noticed just from cutting out a lot of sugar!

  1. I really do lack self-control. 🙂 Boy oh boy! For as much as I talk about healthy eating, I sure surprised myself at my lack of self-control with sweets!! My weak times are usually during naps (when I like to veg on the couch and watch a couple shows or crochet or just relax) and after the kids go to bed at night. It might be because I don’t have their little eyes watching my every move with food and asking for a bite, but I really struggle with snacking! Handful of M&M’s, piece of a chocolate bar, leftover mini candy bar from Halloween/Christmas, or any other chocolatey item I baked or have stashed in the pantry. The homemade items I am not so worried about…it is those dang random candies I have in pantry! I really did see just how bad it was when I had to physically stop myself from entering the pantry one night.
  2. I do not drink enough water. Part of the challenge was making sure you drink half your weight in water (in ounces). For me, that meant I needed to drink at least 57 ounces of water each day. Holy moly was I behind! On a good day, I usually drink about 24 ounces. And that’s a GOOD day. I just don’t default to water….or any drink really. I just don’t drink anything! I have my coffee in the morning and maybe some water with my meals, but in between I really don’t drink anything. I don’t like pop/soda, juices don’t appeal to me (unless I use my juicer, but that’s a lot of effort I don’t want to put forth in the afternoon), and milk seems to constipate me lately. But, I worked hard to drink my 57 ounces and MAN! I used the bathroom like a hundred times that first day. My bladder, poor thing is worn out from pregnancies….let’s just say I had some near misses! 😉
  3. I need to eat more fish. I probably will not start eating more, but I clearly need to. Canned tuna and sometimes shrimp are the only two fish I eat. I have had crab and lobster at restaurants but not at home. My husband and I are so scared to get sick from improperly cooking fish that we just avoid it; I realize it seems odd that I’d allow someone else to cook it (someone I don’t know and cannot physically see cooking it to know that they have done it properly). I have never eaten tilapia or salmon or whitefish or any of those not-so-fishy kinds of fish. I always think I can just buy the frozen tilapia fillets, but I never do. I have canned salmon in my pantry for salmon cakes, but I do not have a set date to get that open and eat it. I realize I need to incorporate fish into our diet more, for the Omega 3’s, but I usually just give the kids (and myself, if I remember) a fish oil supplement. But I have dreams of buying and cooking fish….some day.
  4. I feed my kids better than I feed myself. I am so quick to post about how healthy we eat, how the kids eat lots of veggies, how they eat healthy snacks, blah, blah, blah. But, I started to notice how poorly I ate. My lunches usually consist of leftovers. If there aren’t any, I will make a few slices of bacon or grab some cheese and some crackers or just a bunch of snack foods. And at 1:00, when the boys go down for naps, I just shovel the foods in. There is no real plan for my lunches. The kids? Oh, they eat so well! I plan out their lunches, taking extra care to pack it in their “lunch boxes” most days. I make sure they get a veggie and a fruit, drink lots of water, and I monitor their snacking. I also noticed that if I didn’t sit down with my husband to eat breakfast, I either didn’t eat (and just relied on my coffee to fill me up) or I grabbed a really crappy food choice at about 9:00AM and ate a ton of it! This week was very enlightening with regard to MY eating habits. I thought I just struggled with snacks, but I noticed a lot more!
  5. I find a lot of joy in eating well. Ok, that probably sounds stupid. But, it’s true. My default mood is crabby. Irritable, impatient, grouchy, the opposite of understanding. You get the idea. I just don’t default to a pleasant attitude, unfortunately. I realize this is a heart issue, and I am working on this in my quiet time and with the Lord. BUT, I did also notice that my food choices were largely tied to my mood as well. Beyond getting my heart right, I also needed to get my foods right. No, I am not saying that clean eating is a moral choice or a godly choice or anything like that. I know it is a personal choice, and I know for me, personally, it is the better choice. Drinking a ton of water, eating eggs at least once a day, choosing greek yogurt with berries over a Hershey’s bar, and NOT having four cups of coffee really does affect my mood. Ten years ago, it may not have been as big a deal, but I am getting older and my body is needing certain nutrients that I was depriving it of. Eating well gave me much more energy this week, and I feel like I was much more pleasant to be around (although, I should probably ask my family if that is true or not!). I also noticed my headaches from the past few months were non-existent this week; this definitely confirmed that I need to drink more water and eat better.

All in all, I loved participating in the challenge and am sad it is over. I like checking in each day on the Facebook page and posting my meal pic or sharing how much water I drank. I loved seeing the other girls’ posts, too. I got some great recipe ideas and just enjoyed the encouragement and support.

After seeing how great I feel when I eat well/clean/whatever you want to call it, I would love to keep the encouragement and support going. (I AM NOT SELLING ANYTHING OR RECOMMENDING ANY PRODUCTS. I am not affiliated with Melaleuca or Beachbody or Shakeology or any other company out there doing challenges. And I don’t want it to be about “products”, as obviously the best source for the nutrients we need is from food itself!) If you are interested in starting to eat well or eliminating/reducing a certain food item (sugar, for example), or if you eat clean already and would enjoy to participate in encouraging and supporting each other in continuing to do so, please let me know! I would love to get a group started, perhaps a Facebook page, to just post on about meals or recipes or whatever. If you have no idea HOW to get started eating clean, I would enjoy helping you in that way, too. We started our better eating journey in November 2011, and though we don’t religiously stick to it, I have a good idea how to make good food choices and have a ton of recipes I could share with you. (Obviously, I am not a doctor, so if you have a medical condition or are looking for a weight loss plan, I cannot advise on that. Please check with your doctor before starting any type of plan.)

So….who’s with me?? Would you want to join me? Please feel free to comment below or email me at milkandhoneybreads at yahoo dot com!

Have a fabulous weekend!!

“I will greatly rejoice in the LORD; my soul shall exult in my God…”

Isaiah 61:10a

Kitchen · Menu Plan

Breakfast Ideas

Breakfast is probably my FAVORITE meal. I prefer a savory breakfast, usually, over a sweet. I do love donuts, but I love scrambled eggs and ham so much more. The problem is, scrambled eggs and ham can take more time and energy than I am willing to commit at 6:00Am!

I TRY to plan ahead the night before and pick a breakfast off of our menu plan for the following morning. BUT, I do often forget or fail to make a plan that night before, so having pre-made breakfasts on hand is ideal for us.

I am not talking about boxed cereal or store-bought instant oatmeal. My kids love those things (and I love the amount of time it takes to open a box and pour!), but the exorbitant amount of sugar in them makes for a rough morning. Just picture five wild animals chasing their prey. Starting school at 8:00 is just a ridiculous attempt after a breakfast of cereal.

So, I plan ahead often and make big batches of foods to freeze or refrigerate. They are not fancy foods. They are not difficult to make. The only serious requirement is time set aside to make them. Most of the time I can make them during naps, unless it has been a rough morning and I just sit and watch episodes of Parks and Recreation to avoid moving or thinking. 🙂

If you are like me, wanting good breakfasts on hand but don’t want to have to be up super early to make them, check out the list below for ideas of things to  make ahead of time for your family…

Pancakes – I love the recipe from the Economides family. It makes about 48 pancakes. I usually put half in the refrigerator for the next few days and half in the freezer for the following week.

Waffles – We only have a belgian waffle maker. I do not make waffles as often as I probably should. We just don’t enjoy the thickness of the belgian waffles, and they don’t fit in our toaster very well, so after freezing they do not taste super great. BUT, waffles are a great item to make a ton of and then freeze to just pull out and make however many you need.

Bagels – Homemade bagels are so good! Yes, they take more time than pancakes or waffles, but they are so delicious. A good recipe can be found HERE. We typically just make plain ones and add cream cheese or butter and a cinnamon/sugar mix. They freeze well and toast up nicely.

“Instant Oatmeal” – I love apples and cinnamon instant oatmeal. But the amount of sugar and salt in store-bought oatmeals is just silly. It can be made at home and stored in snack baggies to use as individual servings. AND the prep work is not long at all! THIS is a great recipe. If you are looking to change it up a little, add in some ground flaxseed to the oats for more fiber. they can be stored in the pantry, but if you don’t end up eating them in a week or two, I would recommend tossing them in the freezer, especially if you have the flaxseed in there. Just keeps them fresher longer.

Coffee Cake – Ok, ours is more cake than coffee cake, but making a huge pan of it feeds us for three breakfasts and I control how much sugar we have in it. (Yes, I do have control issues.) It is yummy, and the cinnamon-sugar taste is pretty much the best. You can find it here in a previous post. It will keep in a tightly closed container for about a week; I have frozen a few pieces that were left over and heated them in the microwave to thaw, and they were still good.

Breakfast Burritos – One of my favorites. Easy to make – scrambled a dozen eggs, cook and crumble a pound of breakfast meat (sausage, bacon, ham), shred some cheese and throw it into tortillas (burrito size work best). I roll them and wrap them in first one paper towel each and then in foil. Then I toss them in the freezer wherever I can find room. Sure, it may be a waste of paper towels, but when you go to warm them in the microwave, the paper towel holds in the moisture a bit (just be sure to remove the foil!). Yum!

Muffins – I am pretty sure almost any muffins can be frozen, so make up 24-30 and freeze them for easy breakfasts! I microwave mine to thaw and warm them OR you can pull them out of the freezer the night before and let them thaw on the counter. Easy!

Quick breads – Similar to muffins, quick breads make for quick breakfasts. I freeze mine in slices, so they are easier to pull out individual servings of and thaw. After slicing, I wrap the whole loaf in plastic wrap then place it in a gallon size freezer bag.

Cinnamon Rolls – Sure, they are pretty sugary, but cinnamon rolls are so yummy especially when homemade! Two ways to freeze: after the rising but before the baking (bake while still frozen before thawing) OR after completely baking (thaw and warm in microwave). Either way works for us; we just like to eat them warm and gooey! THESE are a good batch to make.

Those are some foods that come to mind right now. Do you have anything you make ahead of time for an easy, healthy breakfast??

(Don’t get me wrong here…I still buy cereal at Aldi from time to time, when I just don’t feel like prepping foods or we are having a busy/rough week. I just prefer to be able to feed the family homemade items that I know won’t make the kids bonkers an hour later!) 😉


Kitchen · Menu Plan

Menu Plan Monday

Well, well, well. It’s back to posting my menu plan. I have been doing well with scribbling down a quick menu before I shop, but I need to be more detailed. Figured if I post it here, it will force me to write more specifics. 🙂

Keepin’ it simple the next week or so. Focusing on schoolwork (since we’re on a new schedule and need to stay focused before our week off!) a bit more, which means I do not want to be running around at 4:00 thinking about side dishes to go with our main dish. So, here’s what I’ve got…

Breakfast

Cinnamon Roll Baked Oatmeal

PB and Chocolate Chip Baked Oatmeal

Pancakes x 2

Eggs, bacon x 3

Coffee Cake x 3

Bagels, fruit

Egg and bacon hash

Lunch

PB&J x 4

Buttered noodles x 2

Leftovers x 3

Snack-type lunch (the kids have really come to love these) – cheese slices, crackers, yogurt, carrot sticks w/ranch, fruit

Quesadillas

Dinner

Taco Cups, Spanish Rice, Carrots and Cucumbers with Ranch

Broccoli Cheese Soup, Salad

Teriyaki Chicken, Green Beans, Brown Rice

Bacon Tortellini Bake, Carrots, Applesauce

Pizza, fruit, veggies and ranch

Mac and Cheese Casserole, Salad

Corn and Bacon Chowder, Biscuits, Salad

Fettuccine Alfredo, Salad

Creamy Potato Soup, veggies and ranch, rolls

Biscuits and Gravy, Bacon, fruit

Shredded BBQ Pork Sandwiches, chips, veggies and ranch

Snacks

Brownies

Cheese Crackers

Smoothies

Apples and Nutella

Popcorn

Muffins

Anyone else back in the habit of menu planning? Have anything fun and exciting planned on your menu?? Feel free to share!

Homeschool · Kitchen · Organization

Fantastic Lunches!

I have always been happy to not have to pack lunches the night before a school day, since we just eat here 99.9% of the time. No making sandwiches and stuffing into baggies. No remembering to load up lunch boxes in the morning. Yes, I was happy to think less every evening and morning.

BUT, lunch time has been such a hassle lately. Everyone is SO done with school by then (and by done, I mean with their attitudes…not always done with actual work!). Usually the boys have started teasing each other. Someone has cried. OK, like five of us have cried by lunch time. And my patience is GONE!

I read a guest post by Sherry Hayes over at Free Homeschool Deals (LOVE that site/blog!) about using lunch boxes in your home school. I laughed at first because this woman has 15 children, so of course she should use lunch boxes to cut down on lunch prep! And then the more I thought about it, the more I really understood how awesome her idea was. Imagine the time I could save if the lunches were made THE NIGHT BEFORE!

I remember my mother making our lunches the night before and our brown bags or lunch boxes sat on the counter all ready to pack with whatever refrigerated item(s) first thing in the morning, so we could quickly get out the door. I ALSO remember when we were old enough to make our own sandwiches and she’d encourage us to get it ready the night before…and then we didn’t, and we were scrambling around in the morning trying to throw our lunch together. I ended up with lots of cheese and mayo sandwiches, I am sure of it! 🙂 Good thing I liked them.

This past Monday, I finally decided to give lunch boxes a try. There was one problem…We don’t own any lunch boxes! The kids always ask for some during all the beginning of the school year sales, and I always shut that down. Ten dollars (if you’re lucky) a lunchbox….no way! I’d rather save my $50 and order some good pizza for dinner! Even without actual lunch boxes, I was able to find some food storage containers big enough to pack a little lunch in. I should have made this on Sunday night, but since Sunday nights are rough around here I waited til Monday morning to put this together.

My boys watched while I made 5 sandwiches (some PB&J, some just J, some PB&honey), put some little crackers in baggies, some nuts and dried fruits, some yogurt or cottage cheese in smaller containers, and even 5 mini candy bars left over from Halloween. I mean, you can’t have a lunchbox without a dessert!

lunch

This is Ethan’s lunch. He snuck a nibble of his bread before I could package the sandwich. 🙂 The small container has his cottage cheese. So fun!

The kids were so excited to eat how “regular” schoolkids do. They grabbed their box and their water bottle from the fridge and sat to eat and chat. I made a comment about no talking badly about their teacher during lunch. And as soon as I walked away, one of the girls said, “Our teacher is so lame.” 😉 Even little Ethan had a good time with his lunchbox. He thought he was hot stuff, sitting there opening everything up like the big kids.

That post was super helpful with ideas for what to put in the boxes. On Wednesday, we had our first day this week of leftovers from dinner. It was chicken taco soup. I packed the boxes with everything but the soup and just warmed that on the stove, dishing it out as they sat and opened their boxes. Easy peasy! It really has made lunchtime smoother. No arguing about who is having what, no order taking. Everyone knows it is already packaged, and they are still excited (granted, it has only been five days!) to see what I’ve packed them. I have started packing them at night because it makes more sense, especially for mornings like yesterday when we had our mom group at church at 9:30, and I was responsible to bring a food dish. I was so glad to have lunch already figured out, and the kids were able to just sit right down and eat when we got home at noon!

It was a fun experiment this week, and I think we’ll keep it as a regular thing. Guess I don’t have to have 15 kids to need a time-saving idea!